Honeywell Electronic Door Lock Manual: A Comprehensive Guide
This manual provides detailed instructions for installing‚ programming‚ and maintaining your Honeywell electronic door lock‚ ensuring optimal security and functionality for years to come.
Understanding Your Honeywell Door Lock System
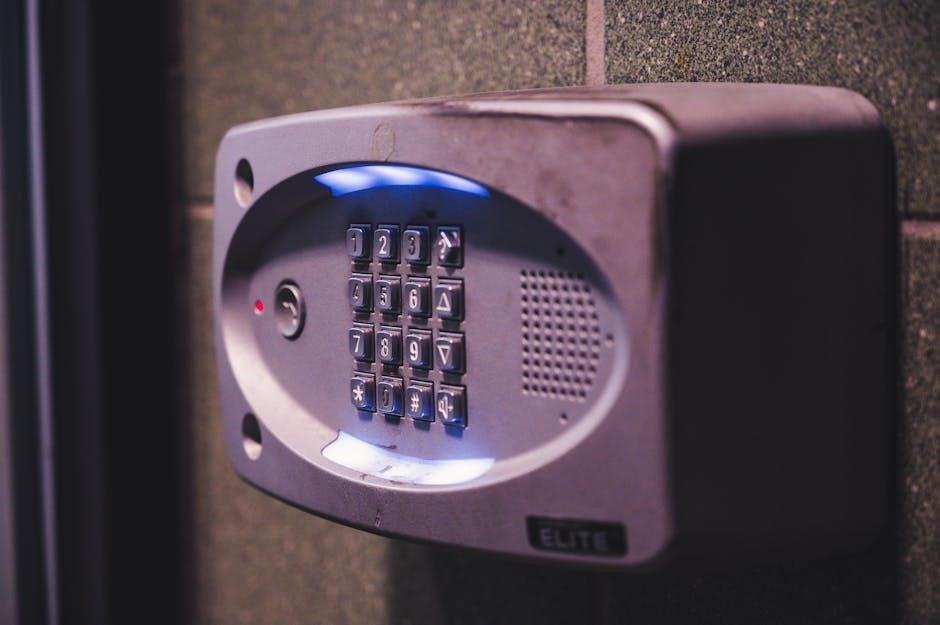
Your Honeywell electronic door lock represents a significant advancement in home security‚ offering keyless entry and customizable access control. This system utilizes a digital keypad for code-based operation‚ eliminating the need for traditional keys and reducing the risk of lockouts. The default programming code is 123456‚ serving as the master password for all initial setup and adjustments.
Understanding the system’s components – the exterior assembly‚ interior assembly‚ and mounting plate – is crucial for successful installation. The lock operates on battery power‚ indicated by LED signals‚ and features audible beeps to confirm actions. Familiarizing yourself with these indicators and sounds will streamline operation. Remember to avoid rechargeable or non-alkaline batteries for optimal performance. Proper installation‚ following the provided steps‚ ensures the lock functions correctly and provides reliable security.
Key Features and Benefits
The Honeywell electronic door lock boasts several key features designed for convenience and enhanced security. Keyless entry via a programmable keypad eliminates lost key concerns‚ while the ability to set multiple user codes grants controlled access to family and guests. The system’s robust design provides a durable and reliable locking mechanism‚ offering peace of mind.
Benefits include simplified access management‚ reducing the need for key duplication and re-keying. The lock’s LED indicators and audible beeps provide clear feedback on operational status. Installation is straightforward‚ and the system’s programming options allow for customization to suit individual needs. Furthermore‚ the lock’s compatibility with standard door preparations ensures a seamless integration into existing home security setups‚ offering a modern and secure solution.
Lock Components and Identification
Your Honeywell electronic door lock comprises several key components. These include the exterior assembly‚ featuring the keypad and lock cylinder; the interior assembly‚ housing the electronic mechanisms and battery compartment; and the mounting plate‚ securing the lock to the door. Identifying these parts is crucial for installation and maintenance.
The keypad allows for code entry‚ while the interior assembly’s knob facilitates manual operation. The tailpiece connects the interior and exterior assemblies‚ transmitting locking/unlocking signals. Familiarize yourself with the location of the battery compartment‚ typically found within the interior assembly‚ and note the polarity markings for correct battery insertion. Understanding each component’s function ensures proper operation and troubleshooting‚ maximizing the lock’s lifespan and security features.
Installation Process
Carefully follow these steps to correctly install your Honeywell electronic door lock‚ ensuring a secure fit and optimal performance for lasting peace of mind.
Preparing the Door
Before beginning the installation‚ meticulous door preparation is crucial for a successful outcome. First‚ confirm your door is a standard size and material suitable for a deadbolt lock installation. Examine the existing door preparation; if a previous lock was present‚ ensure the holes are appropriately sized for the new Honeywell lock components.
If drilling new holes is necessary‚ use a high-quality drill bit designed for the door’s material (wood or metal). Carefully measure and mark the locations for the exterior and interior assemblies‚ as well as the cable passage. Important: Ensure the door’s thickness falls within the lock’s specified range‚ typically between 1 3/8 inches and 2 1/4 inches.
Verify the strike plate alignment on the door frame. The strike plate must align perfectly with the deadbolt to ensure smooth locking and unlocking. Adjust the strike plate position if needed‚ and reinforce the door frame if it appears weak or damaged. A properly prepared door is the foundation for a secure and reliable Honeywell electronic door lock system.
Installing the Exterior and Interior Assemblies
Begin by attaching the exterior assembly to the door‚ carefully aligning it with the pre-drilled holes. Secure it using the provided screws‚ ensuring they are snug but not overtightened to avoid damaging the door or the lock mechanism. Next‚ position the interior assembly over the tailpiece‚ pushing it firmly against the door.
Utilize two 5/16 (8mm) screws and one 1 (25mm) screw to fasten the interior assembly to the mounting plate. Do not overtighten these screws‚ as this can hinder smooth operation. Ensure the interior assembly sits flush against the door surface.
Before proceeding‚ verify that both assemblies are securely mounted and aligned correctly. A proper fit is essential for the lock’s functionality and security. Double-check all screw connections and make any necessary adjustments before moving on to the cable connection stage.
Connecting the Cable
Carefully connect the cable between the exterior and interior assemblies. Ensure the connector is fully seated and securely latched to prevent disconnections. Gently guide the cable‚ avoiding any sharp bends or kinks that could damage the wires within. Proper cable routing is crucial for reliable lock operation.
Once connected‚ tuck any excess cable neatly inside the interior assembly‚ ensuring it doesn’t interfere with the movement of the locking mechanism. Avoid pinching or compressing the cable‚ as this could lead to intermittent functionality or complete failure.
After the cable is connected and secured‚ test the lock’s basic functionality by manually locking and unlocking it using the interior knob. This preliminary check confirms a successful connection before proceeding with programming and final adjustments. Verify smooth operation before completing the installation.

Programming Your Lock
Customize your Honeywell lock’s security by setting a unique programming code and individual user codes‚ enhancing control and safeguarding your home effectively.
Changing the Programming Code (Master Code)
Protecting your Honeywell lock begins with a personalized programming code; The factory default code is 123456‚ serving as the master password for all programming functions. It’s crucial to change this immediately upon installation for enhanced security. To modify the code‚ initiate the process by entering “PC UNLOCK” on the keypad.
Following this‚ input “4UNLOCK” and then enter your desired six-digit new code. Confirm your selection by re-entering the same six-digit code. A successful change will be indicated by the lock. Remember this new code‚ as it’s essential for future adjustments and user code management. Regularly updating the programming code is a proactive step towards maintaining a secure environment. Refer to the full manual at Honeywell Store for detailed visuals and troubleshooting.
Setting Up User Codes
Granting access to family or trusted individuals is simple with Honeywell’s user code feature. After establishing a secure programming code‚ you can create unique access codes for up to eight users. Begin by entering the programming code (default 123456‚ if unchanged) followed by “UC” and a two-digit user ID (01-08).

The system will prompt you to enter a four-digit user code. Re-enter the code to confirm. Each user receives a distinct code‚ allowing you to track entry and exit. For increased security‚ avoid easily guessable codes like birthdays or addresses. Remember to document each user’s code for easy reference. Detailed instructions and diagrams are available in the comprehensive manual found at Honeywell Store‚ ensuring a smooth setup process.
Adjusting Lock Settings
Customize your Honeywell lock to fit your lifestyle with adjustable settings. Options include Auto-Lock‚ which automatically secures the door after a set period‚ and One-Touch Locking‚ enabling quick locking from the interior. To access these settings‚ enter your programming code followed by the appropriate code – refer to the manual for specific codes.
You can also adjust the volume of the beeps and change the keypad illumination duration. Explore features like passage mode for temporary unrestricted access. Remember to save any changes made. Detailed guidance‚ including step-by-step instructions and troubleshooting tips‚ can be found in the official Honeywell manual available at Honeywell Store‚ ensuring optimal performance and personalization.

Operation and Usage
Effortlessly control your door with the keypad or interior knob; the lock confirms actions with beeps and LED indicators for seamless daily use.
Locking and Unlocking the Door
To lock the door manually‚ utilize the interior knob by turning it in the locking direction – ensuring a secure closure. Conversely‚ to unlock‚ rotate the knob in the opposite direction. For keypad operation‚ simply enter a valid user code or the programming code followed by the ‘Unlock’ button. The lock will respond with an audible beep and the bolt will retract‚ allowing you to open the door.
Remember to verify the bolt’s full extension after locking to confirm complete security. The exterior keypad provides convenient access without a key‚ while the interior knob offers a quick manual override. Should auto-lock functionality be enabled‚ the door will automatically secure after a pre-set duration. Always test both manual and electronic methods to ensure proper operation and familiarize yourself with all access options.
Utilize the lock button to secure the door and the unlock button to open it‚ as indicated in the provided documentation.
Using the Keypad
The Honeywell keypad is the primary interface for electronic access. To operate‚ enter a programmed user code – either a personalized code or the factory default (123456) initially. After code entry‚ press the ‘Unlock’ button to retract the bolt and open the door. Avoid pressing any keys until the blue light extinguishes to prevent errors. Remember‚ all programming functions require the master programming code.
The keypad illuminates blue during operation‚ providing visual feedback. A successful unlock is confirmed by an audible beep and the green flash of the Honeywell button. Incorrect code attempts may trigger a temporary lockout to enhance security. Refer to the troubleshooting section for resolving code error issues.
Do not touch the keypad until the blue light turns off. The keypad is sensitive and requires deliberate input for optimal performance.
Understanding the LED Indicators
The Honeywell door lock utilizes LED indicators to communicate its status. A blue illuminated keypad signifies the system is active and awaiting code entry. Two beeps accompanied by a blue keypad and two green flashes on the Honeywell button confirm successful power-up and operation. This indicates the lock has received power and is ready for use.
Different LED behaviors signal various conditions. A flashing red light often indicates a low battery‚ prompting immediate replacement. Incorrect code attempts may trigger a red flash and temporary lockout. The green flash confirms successful unlocking or programming changes. Pay close attention to these visual cues for efficient troubleshooting.
Refer to the manual’s troubleshooting section for a comprehensive list of LED indicator meanings and corresponding solutions. Understanding these signals is crucial for maintaining optimal lock performance.

Troubleshooting Common Issues
Addressing issues like low batteries‚ incorrect codes‚ or mechanical failures is crucial for maintaining your Honeywell lock’s functionality and security‚ ensuring peace of mind.
Low Battery Warnings
Your Honeywell electronic door lock is designed to provide advance warning when the batteries are running low‚ preventing unexpected lockouts. Typically‚ a low battery will be indicated by a flashing red light on the keypad‚ accompanied by audible beeps during operation. It’s important to note that the frequency of these warnings may increase as the battery power diminishes further.
When you receive a low battery warning‚ it’s recommended to replace the batteries immediately with fresh alkaline batteries. Avoid using rechargeable or non-alkaline batteries‚ as they may not provide sufficient power or could damage the lock mechanism. The lock will typically beep twice‚ illuminate the keypad blue‚ and flash the Honeywell button green twice after a successful battery installation.
Even if the lock continues to function after the initial warning‚ it’s crucial to replace the batteries promptly. Continued operation with low batteries can lead to intermittent functionality or complete lock failure. Regularly checking the battery status‚ especially during periods of frequent use‚ will help ensure reliable performance.
Incorrect Code Errors
Encountering incorrect code errors is a common occurrence with electronic door locks‚ and your Honeywell system is designed to handle these situations efficiently. If an invalid code is entered‚ the lock will typically respond with an audible beep and a visual indication‚ such as a flashing red light on the keypad. Repeated incorrect attempts may trigger a temporary lockout feature to enhance security.
If the lock enters a lockout mode‚ wait a specified period – usually several minutes – before attempting to enter a code again. Refer to your lock’s specific manual for the exact lockout duration. Double-check the entered code for accuracy‚ ensuring you’re using the correct programming code or user code. Remember the factory default programming code is 123456.
If you’ve forgotten your programming code‚ you may need to consult the manual for reset procedures or contact Honeywell customer support for assistance. Avoid repeatedly entering incorrect codes‚ as this could exacerbate the lockout duration and potentially damage the keypad.
Mechanical Issues & Solutions
Occasionally‚ mechanical issues can arise with your Honeywell electronic door lock‚ impacting its smooth operation. A common problem involves difficulty with the bolt extending or retracting fully. Ensure there’s no obstruction in the strike plate or door frame preventing proper alignment. Verify the interior and exterior assemblies are securely fastened with the correct screws – two 5/16 (8mm) and one 1 (25mm) – avoiding over-tightening.
If the knob feels loose or the lock is difficult to turn‚ inspect the tailpiece connection to the interior assembly. Confirm it’s properly seated and secured. For right-hand doors‚ the knob should be vertical; for left-hand doors‚ horizontal. If issues persist‚ gently test the lock and unlock functions using the interior knob to diagnose the problem.
Avoid forcing the mechanism‚ as this could cause further damage. If you’re unable to resolve the issue‚ consult a qualified locksmith or contact Honeywell support for professional assistance.

Maintenance and Care
Regular upkeep‚ including battery replacement and cleaning‚ will ensure your Honeywell lock continues to function reliably and securely for extended periods of time.
Battery Replacement
Maintaining proper battery power is crucial for the consistent operation of your Honeywell electronic door lock. The lock will typically provide low battery warnings‚ indicated by flashing red lights or audible beeps‚ signaling the need for replacement. Always use fresh‚ high-quality alkaline batteries – avoid rechargeable or non-alkaline types‚ as they may not deliver sufficient power or could damage the lock mechanism.
To replace the batteries‚ locate the battery compartment‚ usually found within the interior assembly. Carefully remove the cover‚ noting the polarity markings (+/-) inside. Insert new batteries‚ ensuring correct alignment. The lock should beep twice‚ the keypad will illuminate blue‚ and the Honeywell button will flash green twice to confirm power. Do not touch the keypad until the blue light turns off. After replacement‚ it’s recommended to test the lock’s functionality by locking and unlocking the door several times.
Cleaning the Lock
Regular cleaning helps maintain the appearance and functionality of your Honeywell electronic door lock. To clean the exterior surfaces‚ use a soft‚ damp cloth with mild soap and water. Avoid abrasive cleaners‚ solvents‚ or harsh chemicals‚ as these can damage the finish or electronic components. Gently wipe down the keypad‚ exterior assembly‚ and interior assembly‚ ensuring no moisture enters the lock mechanism.
Pay particular attention to the keypad‚ as dirt and grime can accumulate and potentially interfere with button responsiveness. After cleaning‚ thoroughly dry all surfaces with a clean‚ dry cloth. Do not spray any liquids directly onto the lock; instead‚ apply them to the cloth first. Routine cleaning will help prevent corrosion and ensure smooth operation‚ prolonging the life of your Honeywell door lock system.
Regular Checks
Consistent monitoring of your Honeywell electronic door lock is crucial for maintaining its security and reliability. Periodically test the lock’s functionality by locking and unlocking the door using both the keypad and the physical key (if applicable). Verify that the bolt extends and retracts smoothly‚ and listen for any unusual noises during operation. Inspect the keypad buttons to ensure they are responsive and not sticking;
Also‚ routinely check the battery status‚ even if a low battery warning hasn’t appeared. Proactive battery replacement prevents unexpected lockouts. Ensure the door alignment remains correct‚ as shifts can hinder smooth operation. Finally‚ visually inspect the exterior and interior assemblies for any signs of damage or tampering. Addressing these issues promptly will ensure continued peace of mind and optimal performance.